Introduction to Terraform with AWS EC2
Terraform is an excellent tool for developers looking to streamline their deployment process and eliminate headaches derived from manually configuring infrastructure on cloud consoles.
The lead software engineer has asked you to create an AWS EC2 instance. The team needs yet another micro-service to for yet another client request. Your lead engineer is quite picky on configurations, and demands you maintain the same infrastructure standards at the other micro-services. You begin meticulously navigating through the AWS management console, trying your best to read enough documentation to solve the problem but not so much your head spins. As you navigate, you realize you're going to have document each step you take in case you forget, and you’ll have to manual track any future updates to the EC2 instance. A reflexive groan escapes, and you wonder how such a mind numbing, repetitive task can be automated. Surely there is a better, scalable way to create new infrastructure? Perhaps, and this might be crazy, create it with code?
What is Infrastructure as a Code?
Infrastructure as Code (IaC) is a category of tools that automate deployment of cloud software architecture. Whether for an employer or a personal project, all software engineers will at some point build out cloud infrastructure on a platform like AWS, Google Cloud, or Azure. One option is to painstakingly click through a console, manually setting each configuration. IaC tools offer an alternative that lends itself favorably to automation - a developer needs only to describe (via a script) the desired infrastructure and the IaC tool handles the rest. This increases re-usability, since a developer need only run a script to re-create the architecture. IaC tools have configuration options that make it easy to deploy the same architecture to different environments. A popular open-source IaC is Terraform.
Fundamentals of Terraform
Terraform relies on two inputs to create infrastructure - a state and a configuration script. A state refers to the current characteristics of an infrastructure; what resources are active, how the resources are connected, the permissions on each resource - all these are considered part of the "state". Terraform initializes the state with a main script file. Terraform organizes its script into JSON-like objects called ‘blocks’. Each block is further divided into block types with names like provider and resource. More on that later.

Terraform scripts describe the infrastructure to build. After Terraform initializes the infrastructure, it stores a snapshot of the state. Terraform is a declarative language; instead of writing explicit demands (delete this resource, increase this resource CPU) the developer updates the blocks in the initial script and Terraform will execute the necessary steps to reach this new state. It knows which steps to take by comparing the new state (as described in the script) with the old state (the snapshot). This is why it takes a snapshot of the most recent state - to have a reference when moving to a new version.
Now, none of this would be of any use if Terraform could not interact with a cloud provider. Terraform relies on plugins to interact with cloud providers. Plugins enable Terraform to execute the necessary API commands underlying its block-based commands.
Anatomy of a Terraform Script
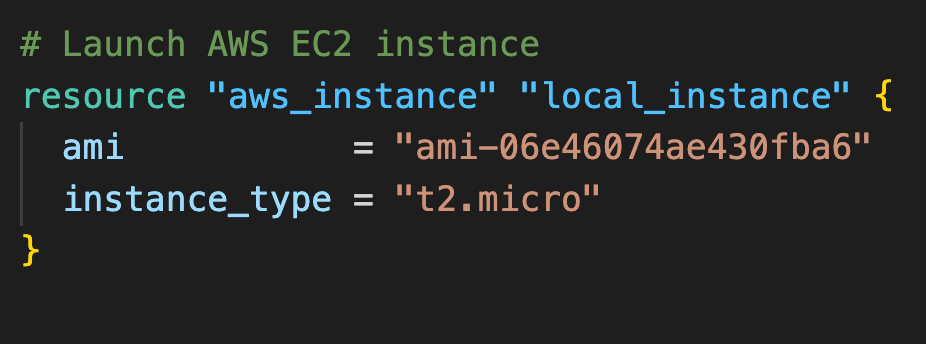
Terraform scripts can be written in a native syntax based off HCL or JSON. Writing in the native syntax is the most common approach. Scripts are organized into blocks. There are multiple types of blocks, with the most common being the resource block. Each block type can be passed different arguments that control the characteristics and functionality of the block. An example of a resource block type is 'aws-instance', which represents an EC2 instance. EC2 instances have a plethora of configuration options, and the developer can specify the characteristics they want using the aforementioned arguments. Below is an example of an EC2 instance described using Terraform native syntax.

The resource block is passed what Terraform calls "labels". The label "aws_instance" specifies that this resource block corresponds to an EC2 instance, and "example" is local name that is only accessible within the scope of the Terraform file - its purpose is to make it easy to reference this resource block throughout the script. While it is unlikely a script will reference attributes of an aws_instance, other resource types - such as network-focused services - utilize local resources frequently.
Ultimately, this block communicates to Terraform "Hello there, I would like one AWS EC2 instance of type 't2.micro', with a Linux OS in N. Virginia region"1. The ami argument relays details about the operating system and deployment region to Terraform - it is an Amazon specific acronym for Amazon Machine Image. ami is an example of a resource type dependent argument - the same argument won’t be available on the EC2 equivalent in Google Cloud. The 'instance_type' argument is an AWS naming convention for specifying such EC2 characteristics as virtual CPU, storage space, and pricing.
terraform and provider Blocks
Infrastructure details for a basic EC2 instance are complete, but the Terraform cannot interact with AWS until a provider is configured. There are two important block types for establishing a provider: terraform and provider. First, let’s examine the terraform block.
Notice the block consists of a nested block with type ‘required_providers’. Blocks nested within blocks is commonplace in Terraform, and and improves readability. Inside there is an argument called ‘aws’ set equal to a JSON-like object. The fields ‘sources’ and ‘version’ define what plugin to install. Terraform relies on plugins to interact with cloud APIs, and will install them automatically so long as the ‘source’ and ‘version’ fields are defined correctly.
Next is the provider block. Provider blocks store configuration details, such as user credentials. Credentials are necessary for Terraform to interact with the provider. Below are arguments (specific to the “aws” provider) that tell Terraform to pull AWS configuration and credentials from paths on the local computer. In order to continue following the example, you’ll need to have an AWS credentials file. Below is a quick step by step guide to get credentials.
Login to AWS and navigate to “Security Credentials”, available under the user profile.
Scroll to the section entitled ‘Access Keys’ and click ‘Create access key’.
Click ‘Command Line Interface’ then ‘I understand the above recommendation’ and click “Next”. The next screen will ask for a description tag. Write whatever you want.
Follow the prompts on the next screen to generate your access keys. Make note of the ‘Access Key’ and ‘Secret Access key’ value - we’ll need them later.
From here, you have all the information you need to configure the provider - the next steps will be creating the AWS configuration files. Follow details on the AWS provider registry if you want to skip these steps and move onto running Terraform commands.
Once installed, generate the config and credentials file by running the `aws configure`command. The files will be located at ~/.aws/credentials and ~/.aws/config, respectively. Executing this command will prompt the user for a AWS Access Key, a AWS Secret Access Key, a region name, and a default format. Enter in the AWS Access Key and Secret Key noted earlier, ‘us-east-1’ (or your region of choice) for the region, and ‘json’ for type.
With AWS configuration complete, it is time to see terraform in action. Here is the complete script used to generate the EC2 instance:
Terraform Commands
Terraform makes available terminal commands to progress through stages of infrastructure provisioning2 process. All Terraform commands follow the format 'terraform <sub-command>'. We'll focus on fundamental commands 'terraform init', 'terraform plan', and 'terraform apply'. But first, if you don't already have Terraform installed, follow the instructions specific for your operating system.
terraform init
After installation, run the command `terraform init` in the directory you want to place your terraform scripts. This prepares the directory for running future commands. The inner machinations3 of initialization are out of scope, but for those detail obsessed you can learn more here. Confirm your console prints this following command execution:
Inside this directory, create a file called ‘main.tf’ and copy in the following script.
terraform plan
`terraform plan` checks the current state of your infrastructure against the configuration derived from the local Terraform modules (i.e. files).4 After execution, it logs what changes will take place if the user decides to build the infrastructure. Double check the changes are in-line with your terraform script (I know I know - theres not much to double check). If everything looks good, proceed to building the infrastructure.
terraform apply
As the name suggests, `terraform apply` applies the plan created from the previous command. This commands handles the actual building of the cloud infrastructure based on the script. After running it, your console will log something like:
Enter ‘yes’ to proceed. When the process finishes, Terraform will notify you.
But of course the best way to check is to navigate to your AWS console and see if your instance is running.
And there is mine running! Still initializing, but it’ll be up and ready for action soon. You’ve successfully used terraform to launch an EC2 instance.
Onwards and upwards
Congratulations! You have experienced a mere fraction of the power of terraform, and I hope encourages you to explore more5. In the next post, we’ll expand our terraform knowledge by building out a more complicated infrastructure - a serverless API using AWS Lambda (you’ll want to get the popcorn ready for this one). Until then, happy coding.
This is a barebones EC2 instance - in a professional setting there would be network configurations. This example is kept intentionally simple to focus on early principals of Terraform.
“Provisioning” is commonly used when talking about computing infrastructure - it is synonymous with “build”.
Fancy term for ‘how it works’. Makes me sound more clever than I am.
If this is the first time you’re provisioning (see footnote 2) for the first time, there will be no object to compare to.
Syntax expressions and child modules are great topics for further terraforming.


